Setting dial-up internet in Linux using Huawei CDMA
Thursday, May 31, 2007
Setting up dial-up internet connection in Linux using HUAWEI CDMA modem
(For- ETS 2288/2051/2077/2251/2551/2577/and other Qualcomm modems)
tested on ETS 2288
Hello to everybody who landed on this page desperately trying to get Huawei modem work on your Linux installation. I have detailed each step, so even if you have just switched to Linux you shouldn’t have trouble following them. All you have to do is simply copy/paste the lines and you should get the problem solved, hopefully.
The commands used in the terminal require root privileges, so type su and the password to login as root.
Step 1. Installation of the Modem
- After booting your OS, connect the phone by plugging in the USB/Serial cable.
- Now enter the command dmesg -c to check if your modem is properly connected. If it is connected you should be able to see similar lines near the end:
ti_usb_3410_5052 1-1:2.0: TI USB 3410 1 port adapter converter detected
usb 1-1: TI USB 3410 1 port adapter converter now attached to /dev/ttyUSB0
In this case your modem is installed and you can directly proceed with setting the dial-up connection. Here it is attached to ttyUSB0 port, if another port is displayed note it and replace the port name in the wvdial.conf file that you will make shortly.
But it’s most likely that you’ll end up with the following lines:
ti_usb_3410_5052 1-1:1.0: TI USB 3410 1 port adapter converter detected
ti_usb_3410_5052: probe of 1-1:1.0 failed with error -5
This is due to the problem in the cable. There's nothing to panic though, just follow the next steps and you should be able to get it installed properly.
- You should create the file 026_ti_usb_3410.rules. To do this enter
gedit /etc/udev/rules.d/026_ti_usb_3410.rules
Then paste the following lines into the text editor and save it.
#TI USB 3410
SUBSYSTEM=="usb_device" ACTION=="add" SYSFS{idVendor}=="0451",SYSFS{idProduct}=="3410" \
SYSFS{bNumConfigurations}=="2" \
SYSFS{bConfigurationValue}=="1" \
RUN+="/bin/sh -c 'echo 2 > /sys%p/device/bConfigurationValue'"
Your rule file is created.
If gedit (default gnome text editor) is not installed then replace it with the available text editor. For example use kwrite command for KDE.
- Remove the cable and re-plug. Type dmesg -c again and this time you should be able to find the lines similar to:
ti_usb_3410_5052 1-1:2.0: TI USB 3410 1 port adapter converter detected
usb 1-1: TI USB 3410 1 port adapter converter now attached to /dev/ttyUSB0
Note the port as mentioned in step 2.
And that ends the installation process.
Step 2. Creating a Dial-up Connection and connecting to the Internet.
Now that the modem is installed, let’s make a dial-up connection.
Note that the dialer “KPPP” is installed by default on KDE desktops. Unfortunately it does not support “stupid mode” and cannot be used.
Using WVDIAL
One way to do this is using the program “wvdial”. It is a terminal program, so continue with the terminal and make sure you're root.
- Creating a connection
For this you have to edit the /etc/ wvdial.conf
Enter the command
gedit /etc/wvdial.conf
Put the following lines to the file changing the Phone, “username” and “password” values as necessary (without quotes) and save it. Also make sure to replace the modem port if its different.
[Dialer huawei]
Modem = /dev/ttyUSB0
Baud = 230400
Phone = #777
Init1 = ATZ
Stupid Mode = 1
Dial Command = ATDT
Username = “username”
Password = “password”
PPPD Options = crtcts multilink usepeerdns lock defaultroute
Now the conf file is ready.
- Connecting to the internet
- Type wvdial huawei as a root in the terminal, and the modem connects. But it’s not all over. You cannot browse and the connection will terminate in minutes.
- The nameserver IPs have to be entered in the file /etc/resolv.conf. Type in the terminal:
gedit /etc/resolv.conf
Copy the IPs displayed as primary and secondary DNS address displayed when the modem gets connected, paste it into this file and save it. It should be similar to this (the numbers would probably vary):
nameserver 203.81.104.25
nameserver 203.81.105.3
- Now type wvdial huawei again as root. And voilà! This time it actually gets connected.
Press Ctrl+c to disconnect.
If you want to avoid the terminal next time you dial, download Gnome PPP and head over to the next section.
Using GNOME PPP
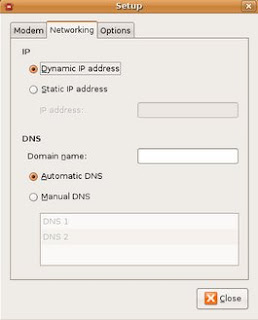
This is a GUI front-end for wvdial internet dialer.
Please note that you have to download this application. After installation, launch it from: Applications > Internet > GNOME PPP.
There’s nothing much to explain here. Just check out the screen shots below and enter the settings.
Gnome PPP in Ubuntu 7.04:


Be sure to make the following necessary changes in the Setup dialog:
Modem Tab- Device: /dev/ttyUSB0 (you’ll have to type it, doesn’t appear in the drop down list)
Type: USB Modem
Speed: 230400
Options Tab- Ignore terminal strings (stupid mode): Checked
Finally press Connect to dial.
That's all to connect to the internet using this neat GUI tool.
Homepage: http://www.gnome-ppp.org/
Notes:
- Use the instructions at your own risk.
- This is based on Tariq Zia's guide. I made it simpler here so that readers require no technical knowledge and less experience in Linux.
- The above steps were tested on Fedora Core 6 and Ubuntu 7.04, but should work just as fine on other distros with Linux kernel ≥ 2.6.* Type uname -r to verify.
- Please check the manufacturer's manual for details and precautions on connecting the modem.
Hope this guide has just made another online Linux user.
Labels: cdma modem, dial up, how to, Huawei, linux
Archives
Subscribe to Comments [Atom]


